Home Automation Using Arduino Uno : 6 Steps
Table of Content
The readings can be displayed on gauges and charts on Node-RED UI. You can control the ESP32 and ESP8266 boards via MQTT from Node-RED. Skyfi Labs gives you the easiest way to learn and build this project. After many hours of debugging the code, I found single digit pin numbers weren't working - make sure your transmitter is placed on pin 10 to be sure.
From there you can add a new item, choosing RCSwitch method, the pin of your transmitter, and the tristate address code. Remember to save, then head back to the main screen screen for your new button. Communication with the Arduino is done using a Node library called duino.
About this project
We provide instructions for installing Node‑RED, InfluxDB, and Mosquitto broker on Digital Ocean . Node-RED can send the sensor readings and any other data to InfluxDB . You can learn from experts, build working projects, showcase skills to the world and grab the best jobs. James has a BSc in Artificial Intelligence and is CompTIA A+ and Network+ certified. When he's not busy as Hardware Reviews Editor, he enjoys LEGO, VR, and board games. Before joining MakeUseOf, he was a lighting technician, English teacher, and data center engineer.

Node-RED allows you to create awesome automation flows without having to write code. So, it is super accessible, specially for those not much keen on writing code. In this Module, you’ll learn how to automatically set all GPIOs to a defined state using master switches and modes. You’ll also learn how to trigger events when something happens (a notification, a threshold value, etc.) Finally, you’ll learn how to set timers and schedule events.
Uploading the Code
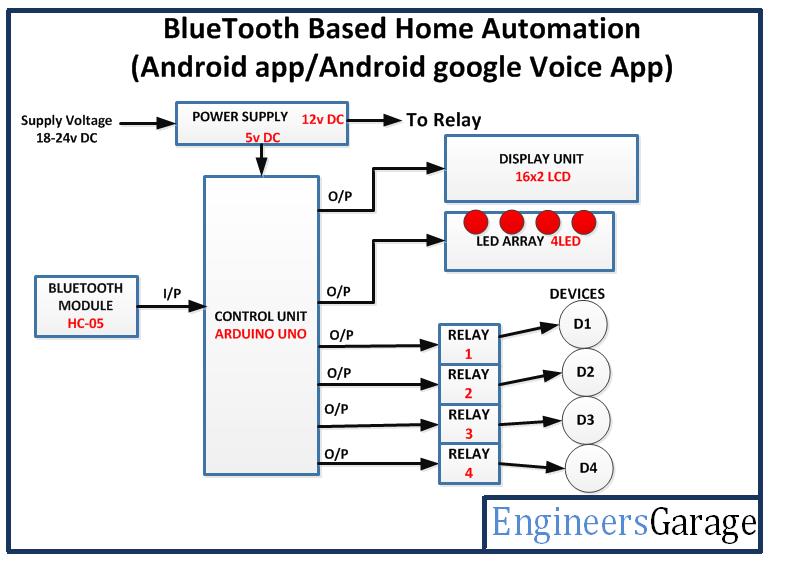
Simply unplug the jumper wire connected to Pin 0 on the Arduino UNO , and re-attempt the code update. After you have successfully wired things up, the next step is to upload the code to the Arduino. If the red and blue LEDs on the HC-05 are blinking, then you have successfully connected the Bluetooth module with the Arduino. This is called a resistor divider because it divides down the input voltage. We obtain the 3.3V level signal from the intersection of these two resistors. This connection will form the second half of the two-way communication and is how the Arduino sends information to the HC-05.

If you have a Raspberry Pi and an Arduino, you can basically achieve the same thing at a fraction of the price, assuming you're willing to put in the time and the effort. You can follow any responses to this entry through the RSS 2.0 feed. Smart entertainment systems are easier to control and navigate. Smart tech makes it easier to change the volume, switch between systems, and get more out of your entertainment device’s features. Nodemcu is a versatile platform that can be used for a variety of home automation applications. With a little creativity, you can use it to create a system that is perfect for your home and your family.
Checking if the site connection is secure
It’s fairly easy to replicate and requires only a handful of components. Arduino community member Roboro built this project where he connected a stationary bike to an Arduino Nano, allowing him to control the streaming of Netflix on a PC. While we used a single relay in this example, you can easily expand your system by using a multi-channel relay module.
Connect the other terminal of the AC power supply to the NO pin on the relay. Connect one terminal of the AC power supply to one terminal of the load. Connect the other terminal of the load to the common pin on the relay. An advanced home automation project with Arduino Uno and Bluetooth sensor to control it, anytime from anywhere. I used Altium designer to draw the circuit and design the PCB. It is a powerful tool that can be used to design and create our own PCBs for our project as well as complex and multi-layer PCBs for industrial use.
2) Power the HC-05 module by connecting the 5V and GND pins to the bus strips on the breadboard. Finally, in the void loop, we check for commands from the Bluetooth serial and turn on and off the lights accordingly. BTserial object, you would have to mention the order of the Tx and Rx pins as connected in the Arduino.
Arduino-based smart home hub allows you to control your devices remotely from outside and monitor your home environment from your phone. In this Project I only use One Relay and there for we can controll only one device , also we can add more relay module and controll all of your home . Comes with an integrated development environment runs on any platform, Windows, Mac, Linux. Easy connection to your PC with USB hardware is open source has a great community More information can be found at the official Arduino website. We use a step-by-step teaching approach, so all the modules and corresponding units are straightforward to follow even with no previous experience.
Here is a Simple DIY Home Automation System Code, you can copy the code and paste it in your Arduino IDE. But before that, you need to add Blynk Library to Arduino IDE. Finally, you can use nodemcu to create a home automation system that is completely customised to your needs. Maker.pro needs to review the security of your connection before proceeding. Here is a link for a small solid state relay package that is offered in 2,4, or 8 channels. 2) Next, it will list all the available devices in your vicinity. You can either upgrade to a higher current relay, or place multiple relays in parallel.
Download the latest Raspian image, copy it to your SD card, and be sure to expand the filesystem and enable SSH. The rest of this guide will assume you've done so, and are connecting over SSH using the default user. Building a better home entertainment system with fun games, easier control of your existing gadgets, and even more fun exercise options is easier than ever with Arduino’s tools.
If you don’t have a Raspberry Pi, you can install all those on a cloud Linux server, for example. We provide installation instructions if you want to use Digital Ocean . If you can’t get a Raspberry Pi, you can still follow along and build your home automation system on the cloud, which requires a monthly payment for the hosting service. Eventually I'd like a hardwired relay, but for now I'll be using the safer option of radio-controlled switches. Before we begin, here's a demo video from the project creator himself.


Comments
Post a Comment